|
|
|||||||||
|
| Contact |
| Jana K4 |


|
|
Jana K4 - Installation Guide |
|
Congratulations! You are about to install the strongest gear set available for a Dana 44.
By installing the JK gear set in your Old School D44 you increase ring gear strength by approximately 40%. This installation can be done by a first timer but it is HIGHLY recommended that you have set up at least four gear sets already. Please read all of the instructions before starting as you may wind up needing to grind or remove something and end up getting grit in your new bearings or destroying your shim pack if you don't follow the correct procedure.
(1) Housing Preparation
- The JK gears fit in most D 44 housings but depending on the casting some may need to be clearanced a 1/16" to an 1/8" by grinding. The ring gear is almost 1/2" larger in diameter so you will need 1/4" clearance all around the old ring gear. To verify the ring gear clearance, remove your old ring & pinion then reinstall just the ring gear and carrier. Tape 4 pennies (1/4" thick) to the outside of your old ring gear and spin it around in the housing. Grind as necessary. Move the pennies to both sides of the ring gear as the ring gear is angled from the back to the teeth. Note: if you remove about .020" of shim from under one of the carrier bearings this makes going in and out much easier.
- As the JK gears are thicker, you will be required to use a carrier for gear ratios 3.73 and down. Also, your ring gear bolt holes in the carrier will need to be drilled out to either 7/16" or 1/2" depending on how your gears were manufactured. Drill to required size but DO NOT install ring gear yet. Make sure burrs from drilling are completely removed and file flange surface flat or the gear will not sit flush thus causing weird ring & pinion pattern.
- I suggest establishing your carrier "no - preload" shim pack without the ring gear on the carrier. Start with a .030" shim on the ring gear bolt side of the carrier. Then add shims to the pinion side until your carrier just slips in and out to establish your starting "slight preload" shim pack.
- Now bolt the ring gear on the carrier and test fit it in the housing. Grind if/as required.
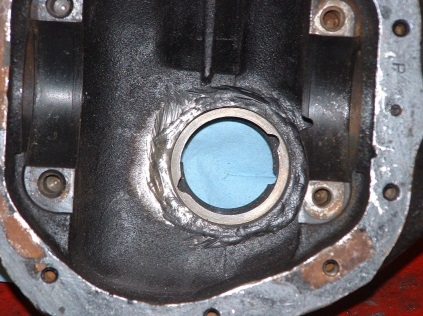
- Now setting the carrier and ring gear assembly aside, you need to notch the pinion bearing head shoulder to provide clearance for a punch to be able to remove the pinion head race as they are very narrow compared to the stock one. See picture.
- Thoroughly clean housing: Removing all grinding debris and etc.
|
Note: Ignore the terrible grinding around the pinion pocket as this was done during proto-typing but not required. Just the Two notches at 2 O'clock & 8 O'clock is all that's necessary.
(2) Setting beginning pinion depth
Note: typically Dana pinion depth is shimmed behind the pinion Cup. In this set up we will be putting a thick .155" shim behind the cup, and a thin shim pack under the pinion Cone. Once the pinion cup goes in with its thick shim it stays in and never comes out. All further pinion depth adjustments are done under the Pinion head cone. Trust me this is easier as getting the cone in and out of the pinion pocket is a pain, without damaging the shim. Of course getting the pinion cone on and off can be difficult without the correct puller, if you have one that works like the ones Yukon sells then no problem, if not having the pinion set up bearing is a blessing.
- Place the .155" shim into the pinion bearing bore such that the counter bore side faces you (this provides clearance for the bearing cage) and install pinion cup.
- Now install your pinion cone (or set up bearing) on the pinion gear with a starting shim pack of .025".
- Install the pinion tail race.
- Put a little oil on the bearings and install pinion gear, yoke and washer as typical but use supplied non-locking nut and apply enough torque to the nut to get the pinion preload just close. Don't worry about getting exact specified preload because we are a long way from final install, and we have not put in any pre-load shims yet.
Note: The correct pre-load is 14-19 in-lbs.
- Install carrier and ring gear. Take gear pattern and adjust pinion depth and backlash as is typical in any ring and pinion set-up.
(3) Final Pinion Install
- After proper gear pattern and backlash are achieved, remove any pinion dummy bearings, if used, and replace with final bearings. Then install the pinion gear with the .450" thick pinion pre-load spacer and aproximately .100" of pinion pre-load shims; add and subtract shims until pinion pre-load is within 14-19 in-lbs with pinion nut torqued to 225 ft-lbs.
Note: Factory JK gears use a crush sleeve but we use a solid spacer to improve reliability.
- With pinion pre-load set, remove yoke and install seal. Apply a thin layer of your favorite gasket sealer to OD of seal as this brand does not come with a coating. Note: The seal looks a little different but just make sure you install it spring-side in (facing in). Note: there are several seals that have this ID & OD (same as D60) but only the ones made for the Jk have the correct offset to prevent the lip of the oil seal from riding up against the back of the Tail bearing and getting wiped out in the chamfer on the end of the yoke. Your seal Will stick out of the housing roughly 1/8", you may want to trim the excess sheet metal off with a skinny wheel on a die grinder to prevent the seal tin flange from getting damaged sliding over rocks. Note: Depending on how large the chamfer is on the pinion yoke your kit may come with a standard D60 seal so the above may not apply. Thus Big chamfered yokes get JK seals and small chamfered yokes get D60 seals.
- Install self locking nut with RED lock tight and torque to 225 ft-lbs.
(4) Final Carrier Install
Remove any dummy bearings, if used and install a .005" shim under each carrier bearing to create the .010-.015" carrier pre-load. Install cap bolts and torque to 80 ft-lbs.
Note: The following bill of materials has all of the parts you need in the kit listed in the order that you will need them.
| Item Number | Description | Quantity |
|---|---|---|
| 1 | Carrier Shim Kit | 1.00 |
| 2 | Ring Gear Bolts 7/16" | 10.00 |
| 3 | Super Shim .100 thick | 1.00 |
| 4 | Pinion Head Cup | 1.00 |
| 5 | 1 Pinion Tail Cup | 1.00 |
| 6 | Pinion Head Cone | 1.00 |
| 7 | 1 Pinion Tail Cone | 1.00 |
| 8 | 1 24 Spline Yoke 1310 | |
| 9 | 1 D60 Washer | 1.00 |
| 10 | 1 7/8-14 Nut | 1.00 |
| 11 | Grease Mark Compound | 1.00 |
| 12 | Brush | 1.00 /td> |
| 13 | .450 Thick Solid Spacer | 1.00 |
| 14 | Preload Shim Kit | 1.00 |
| 15 | 1 Crown Pinion Seal | 1.00 |
| 16 | 1 D60 Nut | 1.00 |
Copyright Jantz Engineering, All rights reserved.
|